And so, I was rather delighted to find a custom brush that caricaturist Court Jones uses extensively in his art (like the sample pictured below of The Beatles) that he describes how to make in a tutorial he posted on the NCN forums some time ago. I've recreated it here to show what a neat effect it can give you:

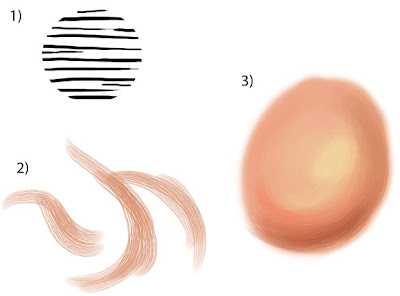
Step 1): Using the circle selection tool, fill a circle with a bunch of random, unevenly drawn horizontal lines drawn with a small hard round brush. Then, under "Edit", choose "Define Brush Preset". This will then add your new brush to the collection of existing Photoshop brushes. But it still needs some more work...
Step 2): In your brush settings, select "Brush Tip Shape". Then set the "Spacing" slider to between 15 and 20%.
Next, select "Shape Dynamics". Make sure that under "Size Jitter", the control is set to "Pen Pressure". Then, under "Angle Jitter", set the control to "Direction".
Finally, select "Other Dynamics" and make sure both controls are set to "Pen Pressure".
Don't forget to save it as a "New Brush Preset". Then, just for safety's sake, quit Photoshop and relaunch it. This will make sure that the brush is saved in the event of a crash.
Assuming you have made all these setting adjustments, the brushstroke thumbnail in the bottom of your brush settings should resemble the hairs of a round watercolour brush - soft horizontal lines that converge into tapered ends. Once you start making some marks with it, they should look like the samples here when at full 100% opacity and flow.
Step 3): When used at full strength, the brush strokes look a little harsh. But if you reduce the opacity to about 30% or less, you can start getting some nice creamy blends just like real paint. You also want to get in the habit of using the eyedropper tool to choose surrounding colours to further blend with, ending up with what looks like the sample I've sketched here.
Now, ideally, everything should be working well for you at this point and, with much experimenting and practise, you may be able to paint nearly as well Court Jones. Not an easy feat, I'll grant you :)
However, if you're using an iMac like me, you may run into a snag. I've found that this particular custom brush will sooner or later cause Photoshop to crash, leaving the message, "Photoshop has unexpectedly quit". Although, after it happens several times, it isn't so unexpected any more. The culprit, as I mentioned in the earlier post, is the "Direction" setting. I'm convinced that is what is problematic for the iMac, anyway. I've mentioned the problem to several Adobe tech support people but they all seem to play dumb, claiming that they've never heard of this happening before. Yeah, I'll bet.
And so, I continue to dislike virtual art media when compared to the real thing. Forever the traditionalist, that's me...